Monday, 22 June 2015

DB installation GUI

Go for database installation using below steps:

install below libraries:
binutils-2.15.92.0.2
compat-libstdc++-33-3.2.3
compat-libstdc++-33-3.2.3 (32 bit)
elfutils-libelf-0.97
elfutils-libelf-devel-0.97
expat-1.95.7
gcc-3.4.6
gcc-c++-3.4.6
glibc-2.3.4-2.41
glibc-2.3.4-2.41 (32 bit)
glibc-common-2.3.4
glibc-devel-2.3.4
glibc-headers-2.3.4
libaio-0.3.105
libaio-0.3.105 (32 bit)
libaio-devel-0.3.105
libaio-devel-0.3.105 (32 bit)
libgcc-3.4.6
libgcc-3.4.6 (32-bit)
libstdc++-3.4.6
libstdc++-3.4.6 (32 bit)
libstdc++-devel 3.4.6
make-3.80
pdksh-5.2.14
sysstat-5.0.5
unixODBC-2.2.11
unixODBC-2.2.11 (32 bit)
unixODBC-devel-2.2.11
unixODBC-devel-2.2.11 (32 bit)


Go to /u01/dba/softwares/database path and follow the GUI same as below. this is the path where i unzipped software.


Action: Click ‘YES’ and proceed next.

Action: select “install database software only” and proceed next

 Action: select the “Real Application cluster database installation” and proceed further
You may check the SSH connectivity if you want. If it success it will move further or else will fail. Make sure connectivity should be password less connectivity
 if it is not a RAC database, just select the host name alone. no need to check connectivity
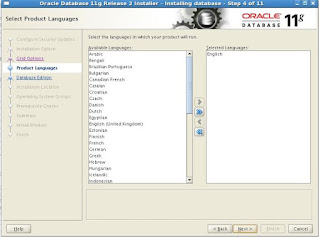
select language

Action: select Enterprise Edition and proceed further


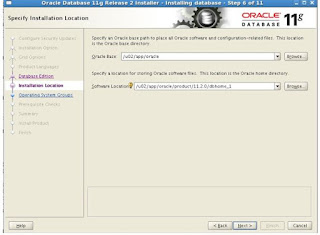
Action: select the oracle base and Home values and proceed next


Action: check the admin,oper groups and proceed further


 Note: make sure all the prechecks are success before installation

Action: click finish to complete the activity. You can save the response file if you want. It will contain installation structure


Action: execute the above script as root user and make sure it run with no error


Action: click close button.
DATABSE installation completed….!!!!!!!

RAC installation with GUI


./runInstaller
 Action: select the 1st option “install and configure grid infrastructure for a cluster “ and click next

Action: select the “Advanced installation” option and proceed to next step


 select language "English"
Action: add your cluster name here and add the SCAN name. unselect the “Configure DNS”. Keep the port as 1521


Action: click the add button and add your second node details. And click next.
You can check the SSH connectivity between the nodes with “SSH Connectivity” button shown above. Enter the “oracle” user password in the password field. 

Check your public and private subnet values and click next


Action: select the “ASM” option if your storage is ASM type.


Action: select the OCR_VOTE_DISKs for creating voting disk location


Action: select the password for ASM sys user and proceed to next


Action: do not select the IPMI option and proceed next
Action: click next

 Action: decide the Oracle Base and Grid home and enter here in the fields and proceed next

  Action: Enter the Inventory directory
Now the pre-checks will start


 Action: make sure everything is succeeded and click next

 Action: save the response file. It consists of all the params set ready for installation.

 Action: the above scripts need to be executed as root user in both nodes. Execute the scripts one after another on each node. Don’t execute simultaneously.
Click OK, once scripts are executed by root user
Note: make sure the scripts give success response. It should not fail. If it is failed analyze the issue and apply the patch 9974223 for 11.2.0.2.
 Note: everything here should be success


Action: click close to close the terminal
GRID Installation is completed….!!!!!!!!!

Tuesday, 2 June 2015

What is logical backup?

What is logical backup?

Logical backup is nothing but taking backup of logical objects (tables, views, indexes, Constraints, stats etc) into a dump file.
There are 2 methods to perform logical backup.
1.EXPDP/IMPDP
2.EXP/IMP

EXPDP is introduced in Oracle 10g version whereas EXP is existing from previous oracle versions.

Logical backup can be prformed for tables,indexes,schemas,tablespaces and complete database. Below are the examples for performing logical backups.
Full Database Export
expdp SYSTEM/password directory=export_dir full=y dumpfile=exp_fulldb.dmp logfile=exp_fulldb.log
exp SYSTEM/password file=full.dmp log=full.log full=y
Schema Level Export
expdp SYSTEM/password  directory=export_dir schemas=scott,test dumpfile=exp_schemadb.dmp logfile=exp_schemadb.log
exp SYSTEM/password  USERID=scott/tiger OWNER=(SCOTT,ALI) FILE=exp_own.dmp
Table Level Export
expdp SYSTEM/password  directory=export_dir tables=scott.emp,test.bonus dumpfile=exp_table.dmp logfile=exp_table.log
exp SYSTEM/password  USERID=scott/tiger TABLES=(scott.emp,scott.sales) FILE=exp_tab.dmp

Now move this dumpfiles to target database, place in import_dir directory and import the data.
Once the data is exported it will be placed in directory export_dir with given filenames. the export status can be seen in log files.
Schema Level Import
impdp SYSTEM/password  directory=import_dir schemas=app_schema,testschema dumpfile=imp_schemadb.dmp logfile=imp_schemadb.log
imp SYSTEM/password  USERID=scott/tiger OWNER=(SCOTT,ALI) FILE=exp_own.dmp
Table Level Import
impdp directory=import_dir tables=scott.emp,test.bonus dumpfile=imp_tabledb.dmp logfile=imp_fulldb.log
imp SYSTEM/password FIlE=exp_tab.dmp  TABLES=(dept,emp)
Full Database Import
impdp directory=import_dir full=y dumpfile=exp_fulldb.dmp logfile=imp_fulldb.log
imp SYSTEM/password  FULL=y FIlE=full.dmp log=full.log


ORA-600 [kwqitnmphe:ltbagi], [1], [0] reported in the alert log file.

ORA-00600 [kwqitnmphe:ltbagi] Cause: This issue arises in 12.1.0.2. The error occurs because there are still Historical Messages without...